
Get Your 3D Grading Under Control: 4 Site Control Principles Every GPS Contractor Needs to Know
- Zach Pieper

- Apr 22
- 4 min read
Updated: Apr 24
Poor site control is the number one avoidable problem we see from contractors running GPS machine control. Not bad models or broken equipment. Site control, the first step on every single project.
We've seen it cost contractors two weeks of production. We've seen it turn a correct machine control model for a balanced project into a mysterious site export. We've seen poured concrete footings that had to be redone because the control was rotated 2.8 degrees. Every one of those situations was avoidable.
That's why we put together our site control series. If you're new to GPS machine control, or if you've been running it for years and have had some unexplained accuracy problems, this is worth your time.
What Is GPS Site Control, and Why Does It Matter?
Site control goes by a lot of names. Localization, site calibration, GPS control, benchmarks... Whatever your GPS supplier calls it, the concept is the same: it's what lines up your 3D machine control model with the real world.
Your project was designed on a virtual grid. Our team takes the engineer's plans and builds a 3D surface model referenced to that same grid. Site control is what tells your GPS equipment where that model sits on the actual ground, both horizontally and vertically.
Get it right, and grading starts clean. Get it wrong, and the whole job can drift in ways that are hard to diagnose until real damage is done.
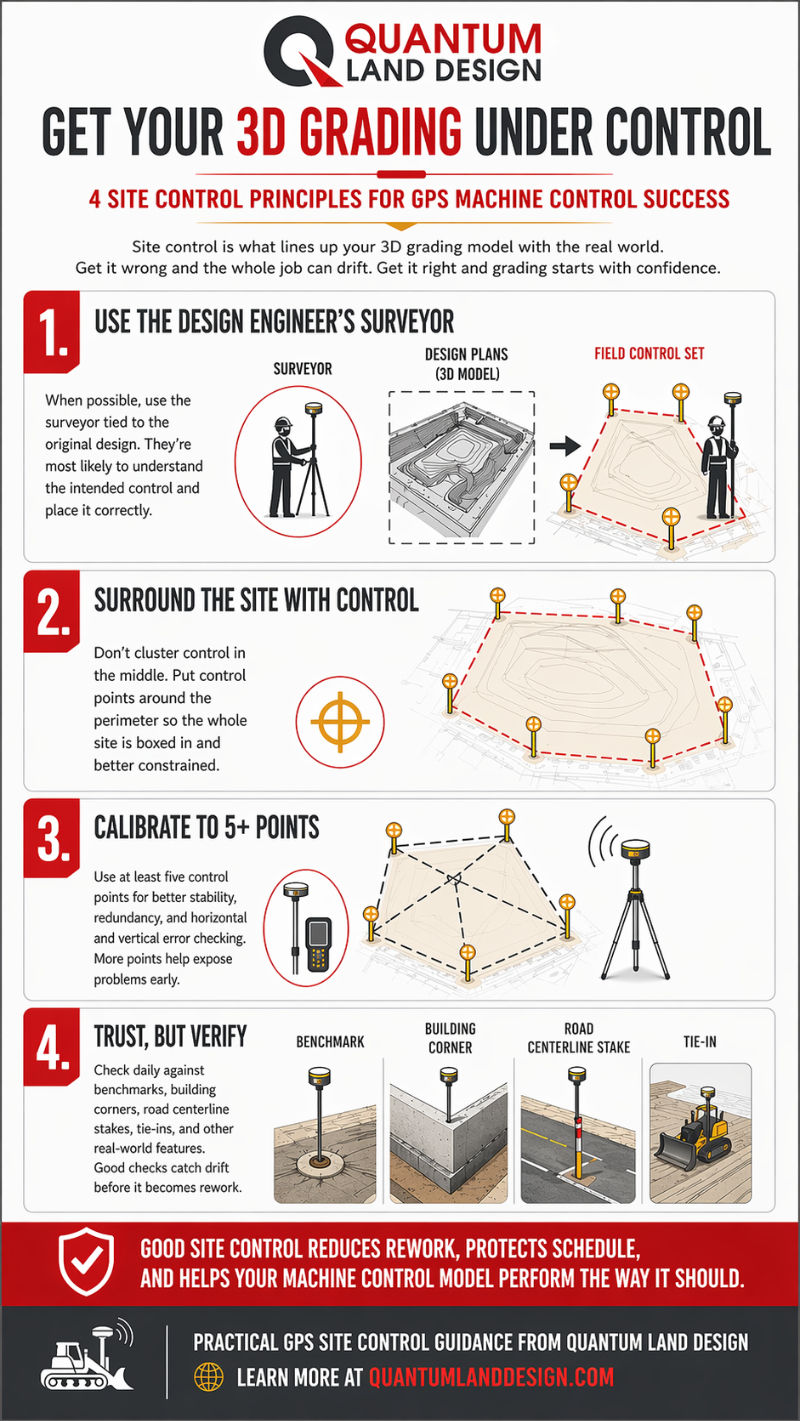
The 4 Principles of GPS Site Control
Over years of working with contractors across the country, we've narrowed it down to four principles that apply to every project, every GPS brand, every site.
1. Use the Design Engineer's Surveyor
When possible, hire the surveyor tied to the original design. They're the only ones who have all the information needed to set your control correctly and the authority to sort it out if something is wrong.
There may be cheaper options. But the contractor who saves $1,200 by setting his own control from a plan sheet and then has to haul in 30 truck loads of rock to raise a parking lot 0.2' didn't actually save anything.
2. Surround the Site With Control Points
Don't cluster control in the middle of the job. Place points around the perimeter so the entire working area is boxed in.
Think of it like pinning a piece of paper to a globe. If you only pin one side, the other side drifts. Same thing happens with GPS control that's placed only on the east property line when the job extends 700 feet further west. The system won't flag an error. You'll just find out at as-built time that the west end is 0.3' high.
3. Calibrate to 5+ Points
Three control points can place your site. Four lets the system start checking for errors. Five gives you full redundancy, vertically and horizontally.
It's the same reason a three-legged stool never rocks but a four-legged one does. With only three legs, you can't tell if one is short. With four, the imbalance shows up immediately.
Shoot all your control points at the start of the project, even for areas you won't work in yet. Those hubs won't survive contact with a lawnmower, a homeowner, or your own crew. Get them in early.
4. Trust, But Verify
Ronald Reagan said it about arms treaties. It applies just as well to machine control.
Even with perfect control, daily checks against benchmarks and surveyor stakes are non-negotiable.
Check your rover against a benchmark before you start grading. Verify grade matches where you left off the day before. When other trades come in for staking, check your system against their stakes.
If something seems off, it probably is. You can always pull out a grade laser or dumpy level to cross-check your GPS.
What Comes Next
Each of the four principles has its own post in the series with field examples, illustrations, and the kind of detail you need to actually apply it on a job. If you're starting with GPS machine control for the first time, read them in order. If you're troubleshooting accuracy problems on an active project, Principle 1 and Principle 2 are often where the solution lies.
Start with the original series intro if you want the full picture, or jump straight to any of the four principles above.
Questions about site control or your machine control model? Call us at 515-505-3510 or email sales@avqld.com.
FAQ: GPS Site Control for Machine Control
What is GPS site control for machine control?
Site control is the process of measuring in GPS reference points on your project site that align your GPS system and 3D machine control model with the real world. Without it, your model has no way to know where it sits on the ground horizontally or vertically. It is sometimes called localization, site calibration, or GPS calibration depending on your equipment brand.
How many control points do I need for GPS machine control?
A minimum of five. Three points can place your site, but give the system no way to check for vertical errors. A fourth allows error checking. A fifth adds redundancy so you can identify and remove a bad point if needed. More than five is better on large sites or long linear projects like roads.
What happens if my GPS site control is set up wrong?
Errors range from subtle grade discrepancies to work that has to be completely redone. We have seen sites rotated 2.8 degrees, parking lots graded 0.2' too low, and designs that appeared to tip or twist across the width of a road. In most cases the machine control model was correct. The control placement was the problem.
Quantum Land Design has built over 20,000 machine control models for earthmoving contractors across the US and Canada. Models, takeoffs and drone data are delivered within 3 business days and are compatible with Trimble, Topcon, Leica, Carlson, and many other systems.