Search Results
80 results found with an empty search
- Intro to Ground Control for Drone Mapping
Quantum has broadcast loud and clear the best practices regarding site control for your GPS machine control systems. When expanding your tech repertoire into drone data, (we have heard the Quantum Flight Pack is good) it is just as important for you to understand how Ground Control Points (GCP) are utilized and why they are necessary when collecting drone data. Ground control is a target placed on the ground that can be seen in your drone photos. It is what ties your drone data to the "ground" and functions in much the same way as site control for your GPS system. We have broken the Ground Control process down into five simple principles you can apply to ANY drone data project and ANY drone system. Click on each one for a separate post with a detailed explanation. 1. Location matters 2. Surround the site 3. Set a few GCP's inside the site 4. Collect topo check shots 5. Measure GCP's with the same GPS system you are using for machine control The center of the GCP target is measured with the GPS system you are using for that project. We can see the targets in your drone photos, it's what we use to align your drone data with your machine control model, the project plans and any other survey work that has been done on the site. Without ground control, at the very best, your drone data will only be within a few feet of the correct location horizontally and dozens of feet off vertically. Nowhere near close enough to make it useful for much of anything when it comes to measuring your progress against the construction plans. Let's address the elephant in the GCP room --> There is a lot of buzz in the industry about PPK and RTK capable drones with very accurate photo geotags. They have their place and big potential, but you still can't beat the simplicity, low cost and reliability of standard ground control. You already have an expensive and highly accurate GPS base/rover system, may as well give it double duty in measuring ground control. Even with a PPK or RTK drone you should still have a few GCP's to guarantee your drone data will align with your machine control model. You rarely get a second chance to fly a constantly changing construction site. On the right, is a photo of a good ground control target. Note it has a clearly defined center, a matte finish and contrasting colors that show up well in drone photos. The basic design you see below is how most good quality GCP's are designed. Also, notice how this target is very low tech. Remember, you will use the GPS rover already set up on site to measure in the center of the target. If a dozer or truck runs over this target, its unfortunate, but you are only out the price of a good lunch. Not a few hundred $$$. It's ok to use ground paint in difficult to access or high traffic areas, but a good quality re-useable target is always best. If using ground paint, heavily paint the target and make it so the center will be easy to see from the air. Lightly painted or target colors that blend into the surface won't serve their purpose very well. Orange and blue seem to work well for most ground conditions.
- Ground Control - Principle 1
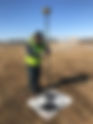
Location Matters In our mostly 2D life on the ground we usually don’t get too worried about what is overhead. When placing ground control, it is critical to look for overhead obstructions. If the drone can't see your GCP as it flies overhead, that GCP can't be used to make your data as accurate as it can be. As best as possible, make sure the drone will be able to capture photos of the GCP from all sides. If you need to place one near a tree, try to place the GCP at least the height of the tree away from it. Avoid placement under powerlines. If you can’t avoid powerlines entirely get out from directly under them. Move a few feet away from a fence line and don’t set a post or lathe right next to a target. Flatten or cut vegetation over about 1' tall right next to your GPC. Once you have done your best to clear overhead obstructions take a look at the ground. Place the target on a fairly flat area a few feet away from sudden grade changes. Instead of placing a target on an embankment, set it at the toe or top of the slope. Avoid placing a target in a parking space or intersection (we have seen more than one GCP with a F-150 or Camry on top). Don't set your target on the back of a curb or on a block wall. Now that you have a good location identified, all you have to do is place the target. Make sure the target is pinned or weighted down well enough to keep it in place for the duration of the flight. Then just place your rover in the center, level up and take the topo shot - just as shown in the photo below. If you are placing it on an existing survey nail or mark, the entire target needs to be flush with the surface and centered on the existing survey point. Give the point a simple description in your controller, like GCP1SW, for "ground control point 1 south west". A simple description like that will make your field work much easier to sort out for your data company or someone back at the office. It's nice to paint the GCP # next to the target, but that's not 100% necessary. It is mostly common sense here, but you would be surprised how many drone photos we receive where a target or two is obscured in most of the photos. One other thing, if someone is measuring in your GCP's while you are flying, remind them to avoid occupying a point as the drone passes over or near it! Next: Principle 2 - Surround the Site Previous: Intro to Drone Ground Control
- Ground Control - Principle 5
Measure GCP's With Same GPS System You Are Using For Machine Control ALWAYS, and only, measure in your ground control with a rover that is fully calibrated to the site control for your GPS system. Take the time to check your GPS system to make sure it is accurate that day. In the end, the only thing that matters is that your drone data lines up with the Engineer's design, your takeoff and your machine control model. If it does not, you will not be able to use the data for volume calculations or to measure production over the duration of you project. For this reason, all of your ground control and check shots should be measured in with the same base/rover GPS setup you are using for machine control. By using the same GPS system, calibrated to the correct site control, you will be guaranteed that your drone data will work in conjunction with any data collected on your site, past, present and future. To measure each ground control target or check shot, just place your rover in the center, level up and take the topo shot - just as shown in the photo to the left. Use a bi-pod if you have one. Your drone data can't be any more accurate than your ground control. A little extra effort here pays off here. Give the point a simple description in your controller, like GCP1SW, for "ground control point 1 south west". A simple description like that will make your field work much easier to sort out for your data company or someone back at the office. It's nice to paint the GCP # next to the target, but that's not 100% necessary. For topo check shots, label them "check" or "CK". Any check shots that are in an important spot like a flow line or tie-in just need to be labeled them clearly. When it's time to export the points you can use the proprietary file type your GPS brand uses or a universal file type like CSV or TXT. However you export the data be sure to select the Point #, Northing, Easting, Elevation and Description fields. That's it. Five simple to understand principles you can quickly apply to any drone mapping project. If you still need to make the jump and add a drone to your fleet, give the Quantum Flight Pack a look. 1. Location matters 2. Surround the site 3. Set a few GCP's inside the site 4. Collect topo check shots 5. Measure GCP's with the same GPS system you are using for machine control If you need to clear up any lingering questions regarding drone systems or ground control email us at sales@avqld.com or call 515-505-3510 ex: 702, we would be happy to hear from you.
- Site Control - Principle 4
Trust, but verify He never knew it, but Ronald Reagan's approach to dealing with the Soviets has a direct application to GPS machine control. This leads us to site control principle four. You hired the project Engineer to place your control, you surrounded the site with points and shot in more than five control points. What could go wrong now? A lot, if you don't use some independent checks to verify that your 3D model matches up to the real world. Here are a few things the surveyor can do while he is onsite to place your control. Usually, the cost to place a few more stakes is minimal the surveyor is onsite anyway. Consider it insurance. Set two or three building corners and mark cut/fill to finish floor elevation. This will allow you to check your site rotation and elevation at the building pad - one of the most important features on any project. If your project is, or incorporates, a new road, ask the surveyor to set a few centerline stakes with cut/fill to finish grade. Again, you can reference your 3D model and linework against it to make sure you are in the right place and reading cut/fills correctly. A couple stakes on the outer edge of your working area at an intersecting road are a good idea, too. Don't run all of your check stakes down the centerline, for reasons discussed in our site control principle 2 blog. Instruct the surveyor to place a benchmark on or near the center of the site that is easy to check. If the center of the site is not feasible, have them give you a benchmark that is easy to access and provides for good GPS reception. If the surveyor stakes utilities at the start of the project check your GPS system to their stakes. The elevations and locations should match your file. Use information about existing conditions from the plans to check your model to the real world. Take a look at the existing conditions plan sheet or grading plan. Look for existing manhole cover elevations, storm sewer inlet elevations, data at the site entrance(s), contour lines, property corners, etc. Any of this information can be helpful to back-check your GPS system to the actual site. If your project ties into an existing street, parking lot, driveway or hard surface, make sure your finish grade matches at the tie-in. There should be elevations called out at the tie-ins you can check against. Reading elevations at hard surface tie-ins might not be perfect due to freeze/thaw or subsurface moisture but should be close. If you have good GPS signal there, verify that your GPS matches the site vertical benchmark(s). Once you are happy with site control and are confident that it matches up to the site you can get to work. Operationally, there are checks you should perform regularly. Check your rover against a benchmark DAILY - before you start grading work. Use your rover to check the elevation across your dozer blade, motor grader, excavator, etc… every day. Even better, grade out a pass and make sure the dirt is to grade across the entire cutting edge. The finished dirt/rock elevation is what really matters in the end. Check your equipment against the benchmark stakes the surveyor placed for as long as they remain in place. Ensure your cut/fills match up against where you left off the day before. This is a quick way to know if something is off from day to day. Stake out to your site control points. When other trades like paving, foundation or even electrical contractors call for staking check your system to those stakes and make sure your system agrees with them. If you have measured in site control and are confident in your work, but your GPS system's reported residuals (errors) are high, talk to the surveyor. Finally, take good care of your - expensive - high tech equipment. Good maintenance can go a long way. We have quite a few clients running 10 year old GPS systems every day. Check your rover pole to make sure it is the correct length. You might have a worn or incorrect tip throwing your elevation off a little. If you measure in site control with a pole of the wrong length, your entire site will be shifted vertically. Consider this a reminder to double-check the pole length you have entered into your rover settings. Make sure the bullseye level bubble on your rover pole is not damaged or off. Is your software and firmware up to date? Some GPS suppliers will update it at no cost. Off season is the best time to do this. Do you need to adjust for cutting edge wear on your heavy equipment? The answer is probably yes. Is your heavy equipment "tight"? A motor grader with worn out linkages might measure in ok up by the job trailer but won't be on grade under load. Who would have thought greasing your equipment regularly would affect your GPS grade control systems accuracy? Lastly, does your GPS system and model pass the eyeball or gut test? Does it seem right when you are onsite? Is site drainage working as expected? While not perfect, a good gut check can go a long ways in making sure your GPS system is working correctly. If something just doesn't seem right, it probably isn't. Remember, you can always dust off that grade laser or dumpy level and use it to double-check your GPS system, too 4. Trust, but verify That's all there is to it. Four simple principles you can apply to any machine control project. 1. If at all possible, hire the project design engineer's surveyor to place your site control. 2. Surround the site with control points. 3. Calibrate to a minimum of five control points. 4. Trust, but verify. If you need to clear up any lingering questions regarding site control email us at sales@avqld.com or call 515-505-3510 ex: 702, we would be happy to hear from you. Rather watch a video? This companion video will walk you through all four principles and give you a few pointers on base station setup and control point placement. Start HERE if you would like to jump right to Principle 4. Quantum Land Design has built over 20,000 machine control models for earthmoving contractors across the US and Canada. Models, takeoffs and drone data are delivered within 3 business days and are compatible with Trimble, Topcon, Leica, Carlson, and many other systems.
- Site Control - Principle 3
Calibrate to a minimum of five control points. We touched on it in an earlier post, but the number of control points you calibrate to matters. Surrounding the site with control is important - but if three site control points encircle the project, is that enough? The answer is NO. You would never have guessed, but our site control discussion will take us to a bar stool for Principle 3. Have you ever noticed that a three legged stool never rocks, but a four legged stool does? If one leg of a three legged stool is a little short the top might be imperceptibly off level but the stool is still stable, it's not obvious your favorite bar stool has a problem. If you have a short leg on a four legged stool it will rock every time. Your GPS system's error checking works on much the same concept. Using only three control points might place your site in the world horizontally but vertically there is no way to check for errors. A fourth control point allows the system to compare the points against each other and find errors. A fifth point is important for redundancy and even better error checking. More than five points is best, but with five you can be confident that your site control has the project in the right place vertically and horizontally. Let's walk through each control point as you shoot them in to understand how each point helps to locate your project in the dirt. Keep in mind our analogy to using pins to place your site on a globe. When the first point is placed, it gets your site roughly where it needs to be but the system cannot rotate it correctly or place it vertically. Imagine placing that first "pin" in your project (the paper) on the globe. You could rotate the project in any direction. In the picture below you will see that site control point one (yellow triangle) has been measured in. The site is held at that point but it is not rotated correctly. The system cannot determine what is "north" on the virtual plans vs. the real world. The second point sets the rotation of the site - now it knows which way is north - but has no way to check if the site is rotated correctly. You will notice that once you have two control points shot in you can stake out to the others close enough to find them. Below you can see that two points have been shot in and the site is now correctly rotated. Notice that the entrance driveways on the right side of the plans now line up with the existing street. Point three gives the system the ability to error check site rotation and adjust it vertically. It still can't check control vertically (remember a 3 legged bar stool never rocks). After you have three good points measured in you will see that horizontally staking out to new points is really close, but vertically it will still be off. Shooting in the 4th control point will allow the system to error check the control points vertically. You will start seeing vertical errors in your control point readout. You now have the project fully "pinned" to the globe. In this picture, if you drew a line between each control point you will see that they box in the working area on this project, as described in our Principle 2 blog post. Measuring in the fifth point gives your GPS machine control equipment full redundancy to check all of the points against each other. If you think you have a bad point you can even turn them off one at a time to determine which one it is. Don't stop measuring in site control after you touch on the 5th hub. Each point you continue to shoot in will help improve the machine control system's accuracy and error checking. You may need more points to box in your site, too. It is best to shoot them all in at the beginning of a project even if you are not working in the outlying areas yet - those shiny new points might be disturbed by a lawnmower, farmer, homeowner (I have never met one that likes lathe in his yard) or even taken out by your own crew. 3. Calibrate to a minimum of five control points. Next: Principle 4 - Trust, but verify Previous: Principle 2 - Surround the site with control points Rather watch a video? This companion video will walk you through all four principles and give you a few pointers on base station setup and control point placement. Start HERE if you would like to jump right to Principle 3. Quantum Land Design has built over 20,000 machine control models for earthmoving contractors across the US and Canada. Models, takeoffs and drone data are delivered within 3 business days and are compatible with Trimble, Topcon, Leica, Carlson, and many other systems.
- Site Control - Principle 1
If at all possible, hire the engineering firm that designed the project to place your site control. Your earth moving project site was surveyed and designed by the engineer on a virtual grid, really no different than the graphing paper you used back in school. Quantum's modelers take the engineer's plans and create a 3D model for your grading equipment that is referenced to the virtual grid originally laid out by the design engineer's surveyor. Site control is what allows your GPS equipment to know where you are on the engineer's design and places your machine control model in the correct place both horizontally and vertically. This leads us to our first principle of good site control. Why hire the design Engineer's surveyor, you ask? There may be someone that will do it cheaper, faster or you want to help out your brother-in-law's new surveying business. All of those are great reasons to hire someone else, but not good enough. The engineering firm that designed the site is the only one that has all of the information necessary to set your site control and the authority to figure out how to fix it if there is a bust. If getting it right the first time is not a good enough reason here are a few more (the list continues to grow) real world examples, courtesy of our clients to help you understand how important correctly placed site control is. On one of his first GPS jobs Contractor A took the low bid from a surveyor to place site control. He completed rough grading and excavated trench foundations, which were poured…only to find out his site control, and all of his work, was rotated 2.8 degrees from the correct orientation….. The design engineer's surveyor immediately found the issue as soon as he set up onsite. Contractor B thought he would save a buck and just use the control he found on one of the plan sheets - referenced to a couple manhole centers and a fire hydrant. What he missed was that vertical control was based on a railroad spike in an electric pole. When the design engineers surveyor staked the building it was 0.2' low. The elevations numbers on the manholes and hydrant were from old city plans. The $800 bucks Contractor B saved by setting his own control did not pan out He had to haul in thousands in rock to raise buildings and parking lots 0.2'. Contractor C worked on a large residential project that was in state plane control - or it seemed to be. Turns out the job had switched engineers a couple times. The original firm set up their site control and design in a "modified" state plane system. Somehow they started off a couple feet from true state plane control but went ahead and used that setup for design. The low bid surveyor hired to place the contractor's site control put it in the true state plane system. When Contractor C set up on site the machine control file and existing roads were not quite matching up. Contractor C lost 2 weeks of production by the time they figured out the issue and hired the design engineer to place control. Contractor's D through Z tried to use single point control on their engineered projects….. No need to share the stories here. It just never works right. Contractors A, B and C would have avoided costly delays and unplanned material expense had they chosen to hire the design engineer's surveyor. In every case the design and machine control model were correct and in the right location. Principle 1: If at all possible, hire the engineering firm that designed the project to place your site control. Next: Principle 2 - Surround the site with control points Previous: Get your 3D grading under control Rather watch a video? This companion video will walk you through all four principles and give you a few pointers on base station setup and control point placement. Start HERE if you would like to jump right to Principle 1. Quantum Land Design has built over 20,000 machine control models for earthmoving contractors across the US and Canada. Models, takeoffs and drone data are delivered within 3 business days and are compatible with Trimble, Topcon, Leica, Carlson, and many other systems.
- Get Your 3D Grading Under Control: 4 Site Control Principles Every GPS Contractor Needs to Know
Poor site control is the number one avoidable problem we see from contractors running GPS machine control. Not bad models or broken equipment. Site control, the first step on every single project. We've seen it cost contractors two weeks of production. We've seen it turn a correct machine control model for a balanced project into a mysterious site export. We've seen poured concrete footings that had to be redone because the control was rotated 2.8 degrees. Every one of those situations was avoidable. That's why we put together our site control series. If you're new to GPS machine control, or if you've been running it for years and have had some unexplained accuracy problems, this is worth your time. What Is GPS Site Control, and Why Does It Matter? Site control goes by a lot of names. Localization, site calibration, GPS control, benchmarks... Whatever your GPS supplier calls it, the concept is the same: it's what lines up your 3D machine control model with the real world. Your project was designed on a virtual grid. Our team takes the engineer's plans and builds a 3D surface model referenced to that same grid. Site control is what tells your GPS equipment where that model sits on the actual ground, both horizontally and vertically. Get it right, and grading starts clean. Get it wrong, and the whole job can drift in ways that are hard to diagnose until real damage is done. The 4 Principles of GPS Site Control Over years of working with contractors across the country, we've narrowed it down to four principles that apply to every project, every GPS brand, every site. 1. Use the Design Engineer's Surveyor When possible, hire the surveyor tied to the original design. They're the only ones who have all the information needed to set your control correctly and the authority to sort it out if something is wrong. There may be cheaper options. But the contractor who saves $1,200 by setting his own control from a plan sheet and then has to haul in 30 truck loads of rock to raise a parking lot 0.2' didn't actually save anything. We've seen that exact situation. 2. Surround the Site With Control Points Don't cluster control in the middle of the job. Place points around the perimeter so the entire working area is boxed in. Think of it like pinning a piece of paper to a globe. If you only pin one side, the other side drifts. Same thing happens with GPS control that's placed only on the east property line when the job extends 700 feet further west. The system won't flag an error. You'll just find out at as-built time that the west end is 0.3' high. Here's a full breakdown of how to surround the site correctly. 3. Calibrate to 5+ Points Three control points can place your site. Four lets the system start checking for errors. Five gives you full redundancy, vertically and horizontally. It's the same reason a three-legged stool never rocks but a four-legged one does. With only three legs, you can't tell if one is short. With four, the imbalance shows up immediately. Shoot all your control points at the start of the project, even for areas you won't work in yet. Those hubs won't survive contact with a lawnmower, a homeowner, or your own crew. Get them in early. Read the full breakdown on why five is the minimum. 4. Trust, But Verify Ronald Reagan said it about arms treaties. It applies just as well to machine control. Even with perfect control, daily checks against benchmarks and surveyor stakes are non-negotiable. Check your rover against a benchmark before you start grading. Verify grade matches where you left off the day before. When other trades come in for staking, check your system against their stakes. If something seems off, it probably is. You can always pull out a grade laser or dumpy level to cross-check your GPS. The full principle 4 post covers everything worth verifying. What Comes Next Each of the four principles has its own post in the series with field examples, illustrations, and the kind of detail you need to actually apply it on a job. If you're starting with GPS machine control for the first time, read them in order. If you're troubleshooting accuracy problems on an active project, Principle 1 and Principle 2 are often where the solution lies. Start with the original series intro if you want the full picture, or jump straight to any of the four principles above. Questions about site control or your machine control model? Call us at 515-505-3510 or email sales@avqld.com. FAQ: GPS Site Control for Machine Control What is GPS site control for machine control? Site control is the process of measuring in GPS reference points on your project site that align your GPS system and 3D machine control model with the real world. Without it, your model has no way to know where it sits on the ground horizontally or vertically. It is sometimes called localization, site calibration, or GPS calibration depending on your equipment brand. How many control points do I need for GPS machine control? A minimum of five. Three points can place your site, but give the system no way to check for vertical errors. A fourth allows error checking. A fifth adds redundancy so you can identify and remove a bad point if needed. More than five is better on large sites or long linear projects like roads. What happens if my GPS site control is set up wrong? Errors range from subtle grade discrepancies to work that has to be completely redone. We have seen sites rotated 2.8 degrees, parking lots graded 0.2' too low, and designs that appeared to tip or twist across the width of a road. In most cases the machine control model was correct. The control placement was the problem. Quantum Land Design has built over 20,000 machine control models for earthmoving contractors across the US and Canada. Models, takeoffs and drone data are delivered within 3 business days and are compatible with Trimble, Topcon, Leica, Carlson, and many other systems.
- ConExpo Con/AGG 2023 Registration
Ready for Conexpo 2023? We are! Quantum Land Design has big plans for the show. It starts with our booth in the West Hall (W43207), includes two education sessions (drone data and machine control) along with more we will share later. We are looking forward to meeting with many old friends and hundreds of new clients we've only met virtually since ConExpo 2020. Your first step will be to Register for the Show. Be sure to use Quantum's Conexpo promo code to secure a big discount on your registration, it's QUA9684C. Just enter it when you register. Maybe you can "invest" your savings at the poker table. Whether it's our sessions or any others seriously consider the education program. Knock 20% off the top by using our education promo code EDUCATION20. Look at it this way, sign up for five education sessions and you get one free. Multiply that by applying what you have learned and you are effectively getting paid to attend the education sessions. How can you beat that ROI? Looking forward to seeing you there! We asked ChatGPT's artificial intelligence model how to get the best out of your trip to Conexpo. Click here for ChatGPT's six simple tips anyone can follow.
- Bart Booth - Quantum's Earthwork Takeoff Pro
Quantum is excited to introduce Bart Booth, our new Manager of Earthwork Takeoffs You asked for world-class earthwork takeoffs, so we teamed up with the best in the business. Our takeoff services combine Bart’s 20+ years of real-world heavy civil experience with the detailed AgTek earthwork reports you’ve come to know and trust. By leveraging Bart and his AgTek prowess you'll get accurate volumetric calculations you can confidently bid from. ---We are always accepting new clients from the US and Canada.--- Professional Earthwork Takeoffs for Any Project Bart and our team can handle nearly every type of civil construction project, including: Commercial site development (any size) AI data centers Heavy highway and road construction Residential and housing developments City street reconstruction Warehouses Whether you’re bidding a 5-acre commercial pad, multi-phase development, Google data center or highway interchange, our earthwork quantity takeoffs are built for accuracy and clarity. We'll provide detailed deliverables you can take to any client - even a Google Earth file overlaying your project on the real world. What is an Earthwork Takeoff? An earthwork takeoff is a detailed volumetric calculation of cut, fill, rock excavation, and import/export quantities based on civil plans or drone data. Accurate takeoffs reduce bidding risk and improve job profitability. If you are new to earthwork or takeoff software we are here to help. More Than Just Cut and Fill Our services go beyond basic volume reports. We also provide: Stripped vs. Subgrade volumes with clear import/export volumes Rock excavation calculations using boring logs Drone data integration and existing surface verification Over-excavation and change order support - we just helped a contractor secure a $$$ six figure change order. Takeoffs aligned with your GPS machine control models When your takeoff, drone data, and 3D machine control model all match, your estimating and field production stay in sync. 3-Business Day Turnaround Yes, we maintain a 3-business day turnaround on most earthwork takeoffs. Same speed you’re used to with our machine control models and drone data services. Straightforward lump-sum pricing. No surprises. Earthwork Takeoff Examples Here are several examples of Quantum's takeoffs you can download and review. Ready for a Quote? If you’ve got a project coming up, send the full PDF plan set (and boring logs for those rocky jobs) to: takeoffs@quantumlanddesign.com You'll be surprised with our affordable pricing. For our fee you'll buy back time to actually estimate your project, without spending hours buried in the takeoff. From initial bid through grading, utilities, and as-builts, Quantum Land Design is here to help you bid smarter, control costs, protect and even grow your margins. Email Bart anytime with questions or to request a quote.
- Quantum’s Zach Pieper Talks Drone Data in Construction on Equipment World’s "The Dirt"
Quantum's own Zach Pieper recently joined Bryan Furnace on Equipment World's YouTube series, The Dirt , to share insights on how drone data, together with with machine control, can transform construction workflows. In their conversation, they address common contractor questions and misconceptions about drones, covering topics like cost, ease of use, and impact on profitability. Key Takeaways from the Discussion: How Drone Data Benefits Construction Management Drones offer contractors a valuable tool for gathering accurate data. They can replace and/or supplement traditional methods, like GPS surveying and laser tools, to improve decision-making on-site. With drone data, contractors can conduct pre-construction topographic surveys, verify yardage moved, and ensure accurate billing and pay applications. This data serves as proof of work completed and helps adjust production metrics for future bids. Your finish grade machine control model can also double as a reference for comparing drone data against the completed project. When Should a Contractor Use Drones? Drone usage isn’t just for massive projects. Even on smaller sites, the benefits can justify the cost. For example, a contractor working on a two-acre dam project used a series of drone flights to confirm over-excavation volumes, resulting in $250,000 in change orders that would have otherwise almost certainly been under-paid. Getting Started with Drones Contractors can choose to hire an external firm to fly and process data or invest in their own drone. Zach recommends starting with a local service provider to learn the process, then gradually transitioning to managing flights independently. For those handling flights themselves, outsourcing data processing is often a cost-effective option. Contractors can simply upload their drone photos and ground control data to an outside processor, saving time and reducing in-house tech requirements and employee demands. What Does It Cost to Use Drone Data? Typical costs for full-service drone data collection, including trave, flights and data processing, range from $1,200 to $3,000 per project, depending on site complexity and size. For contractors looking to fly their own drones, an entry-level drone with required accessories costs around $5,000. Zach notes that even with the initial investment, drones can pay for themselves quickly by preventing costly errors in yardage or volume calculations. Ease of Use Modern drones are user-friendly, with automated flight plans and GPS integration making them simple to operate. The majority of contractors can conduct a 40-acre site survey in under a couple of hours, reducing time spent on-site while providing accurate data for better project tracking. Watch the Full Episode Here Watch on YouTube Have More Questions? Quantum Land Design is here to help contractors integrate drone data into their operations. Email us to learn more about how drones can boost productivity and improve accuracy on your job sites. For more in-depth resources and guidance, visit our Education Center to explore articles, tutorials, and insights on maximizing construction technology.
- ConExpo Tech Talks
The Conexpo folks at the AEM has put together a great resource for new and experienced gps machine control users alike. They have gathered everything from in-the-cab how to's to question and answer questions with contractors. It's worth your time to login and scroll through the extensive offerings. Click here to get started.
- ConExpo 2026: Visit Quantum Land Design in the North Hall (Booth N11127) + Registration Discount Code
ConExpo-Con/AGG 2026 is coming to Las Vegas, Nevada from March 3–7, 2026 and Quantum Land Design is showing up bigger than ever. We’ve doubled our booth size, doubled our team, and will host a must-see education session for contractors and dealers in the earthmoving industry. Where to find us at ConExpo 2026: North Hall - Booth N11127 We're in the same neighborhood as your favorite earthmoving software companies like InSite, HCSS and Autodesk. Don't Miss our Education Session: How to Use Drones in Your Earthmoving Business - Practical Applications We'll be sharing how contractors can implement drones in their business to make more money. No endless rant on the "potential" of drones. Real stories and tech tips from contractor experience. Operate an Excavator with Machine Control Thanks to Tenstar Our team is excited to host a Tenstar excavator simulator running Topcon machine control. Hop in the seat and give it a try yourself. 3D utility and structural excavation models are our fastest growing segment, you'll see why once you've put your hands on the controls. Learn more about how construction simulators can accelerate your operator onboarding and skill development at our blog post. Register With Our ConExpo 2026 Discount Code: Click here to Register for ConExpo and use our Discount Code QUA4869C for a big discount Register before September 12th to secure the Early Bird discount rate. Seriously consider registering for the educations sessions. It's a rare opportunity to learn from the best in the industry. We are looking forward to meeting with many old friends and hundreds of new clients we've only met virtually since ConExpo 2023. Construction technology, machine control, takeoffs and drone data are always evolving. We love hearing how contractors and dealers like you are applying the latest technology on earthmoving and paving projects. See you at ConExpo 2026!